iCreateOFX Investment User Guide

1. Program layout.
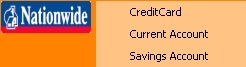
1.1 The Broker script stack.

Located to the left of the screen, this contains all the shortcuts to loading the different brokerage CSV files. In addition to this, the stack includes an iCreateOFX Generic script. The Generic script will load CSV files with a layout described later in this text.
1.2 The Top command strip.

The three buttons to left of the command strip perform the following actions (described from left to right).
a. Write OFX – Button to write OFX file. Use this AFTER loading your CSV file into the grid (via the script buttons).
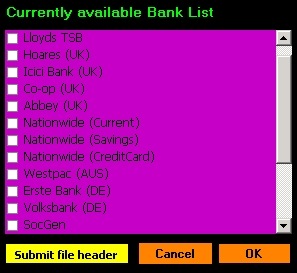
b. Download Scripts – This  button starts the interface to download additional scripts. NOTE: The program ships only with the Generic script.
c. Settings – Use this button to access the (brokerage) Account settings and the Stock definitions.

The Show Advanced button. This controls the view-ability of three extra columns in the grid. The data has been set to default values, however, should you wish to change those values, you can do so. A description of the contents here these columns can be found later in the this text.
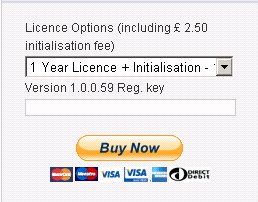
1.3 Registration and Licensing.

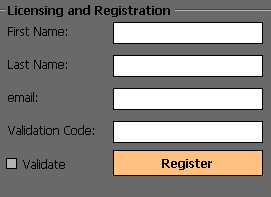
As the name suggests, this section of the screen handles the registration and licensing.
a. During the 30 Day trial, the program will display advertorial material, and for those running the program on a small screen, limit the size of viewable space. Should you wish to utilise the whole screen space and / or register with us, while connected to the internet please fill in the registration details and submit.
b. On purchasing a license to the program (before or after the 30 Day trial period expires), you will utilize the same screen to validate to License key. Please ensure you select the option to validate if you are still covered by the trial period.
2. Loading the Brokerage CSV file.

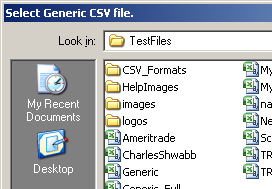
Select the required script from the Broker Script Stack. You are then presented with a Open file dialog box which you should utilize to browse to the file that you want to load. Choose the file and select Open.
It is important that you select the correct file for the chosen script since this will ensure no errors in writing out the investment OFX file.

The selected script name is always displayed in top left hand corner of the Open file dialog.
2.1 The Account details dialog

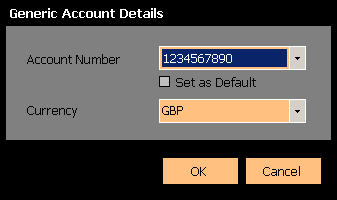
The account details dialog will be fired off the first time you load a brokerage file. This records and saves brokerage account details to be utilized to write a valid OFX file. The details are limited to account number and account currency.
By default the Generic Broker (thus Generic Script), ships with a dummy account set up with the system currency as its currency, and will be the default account used for the Generic script.
To add a new account to your Brokerage,select Add New Account from the Account Number drop-down, type the new account number and select the currency. Set it as the default by selecting the appropriate checkbox and select OK. This will the be the default account used to write OFX files for that particular brokerage.
You can also fire up the account details dialog by selecting the brokerage hyper-link in the bottom right corner. You can only do this, though, after loading a file into the grid.
2.2 The Action Map dialog

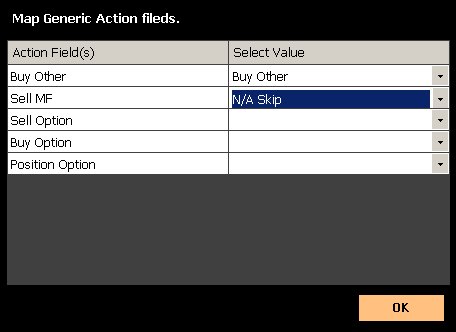
The first time you load a Brokerage file into the grid, you may be prompted by the Map Actions dialog. The purpose of this dialog is to map the specific transaction action descriptions of the brokerage. Brokers do choose to describe actions differently, for example, one broker may describe a transaction to buy stock as BUY whereas the next broker describes it as BUY STOCK. Both are correct, though we can not ship the multitude of these definitions since there could be hundreds of thousands of brokerages around the world (which the program aims to support). The task would be of some magnitude! Notwithstanding, some scripts (where our beta testers provided us with full details), do contain comprehensive action maps.
The mapping itself is straight forward. In the left column (headed Action Field(s))of the Map Actions Grid are listed the actions in your file that have not been shipped. In the right column (headed appropriately Select Value) are drop-down options to describe the actions supported by the program. Against each action, select the descriptive value from the corresponding drop-down list. Where no description matches an action you are mapping, select N/A Skip. This will ensure that you do not encounter errors when you attempt to write out your OFX file.
A Comprehensive list of supported actions/transaction types will be provided later in this text.
2.3 The Stock details dialog.

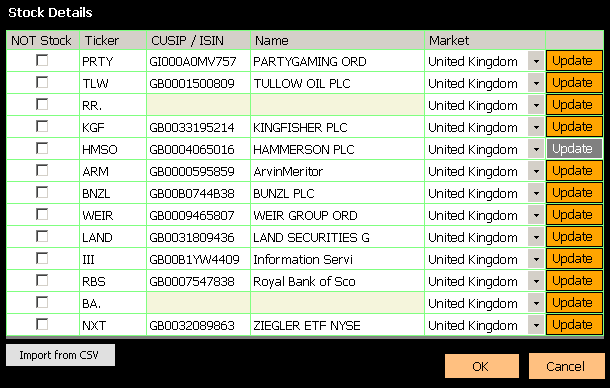
Similar to the Action Map dialog, the Stock Details dialog is fired up the first time you load a broker CSV file to the grid.
The purpose of this dialog is to obtain unique stock identification details that are necessary to write a valid investment OFX file. These details include the identifiers that are publicly available including the stock name and the CUSIP / SEDOL / ISIN number for each stock in your file. This data is not normally included in a CSV file, however, in the cases where it is included, then the program uses the included data and will not prompt you.
Usage is by selecting the appropriate market on which the stock is listed and (while connected to the internet) pressing the Update button. The program will then fetch data required and store it on your computer.  For each stock, this only has to be done once, such that if you traded the same stock on a future date, the program will not need to fetch the data again.
You also have the option of importing the data from a CSV file or of manually typing it into the respective cells of the grid.
For Non-stock items, e.g some brokers (and our Generic script) utilize the value $CASH on transactions such as cash withdrawals and cash deposits in the action field, select the check-box in the NOT Stock column. This will disable the remainder of the row, and you do NOT have to enter additional data.
2.4 The loaded file

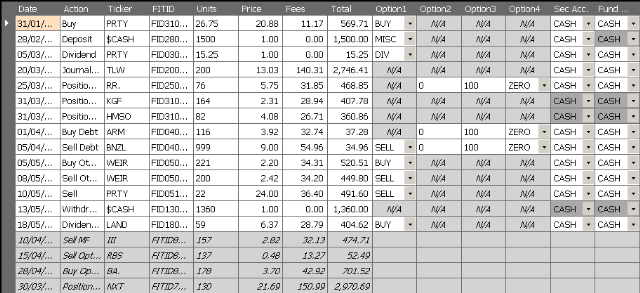
The grid is laid out in a sequential manner with the minimum necessary details to write a valid investment OFX file. The first eight (8) columns of the grid are described in the table below.

Field Description
Date Date of transaction
Action Transaction action – eg Buy, Sell
Ticker Stock ticker symbol
FITID Unique transaction ID
Units Number of units involved in transaction
Price Price per unit
Fees Fees associated with transaction (includes taxes and commission)
Total The total value of the transaction
* Buy = (Units * Price) + Fees
** Sell =(Units * Price) – Fees

* and ** – This does not apply to Buys or Sells of  Bonds (Debt), Options or Mutual Funds which are factored by par values and / or shares per contract.
Its worthy a mention here about the data validation routine of the program. The grid will display an error icon in the Total column if the value does not equate to the computed correct amount. Hovering over the icon will display a suggested value. Take a while to review the data, and when you are happy
2.5 The Generic CSV file Layout.

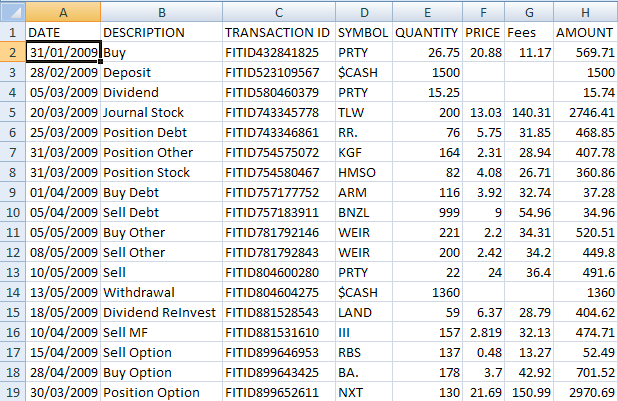
The Generic script will load a CSV file laid out as in the figure to the left. In total, there are eight fields of data separated by comma. The details of the columns are:

Field Name Description
Date The date of the transaction
Description or Action of the transaction
Transaction ID The unique transaction ID *
Symbol or Ticker for the transacted stock
Quantity The number of units of stock(s)
Price The price per unit of stock item
Fees Fees e.g tax & commission
Amount The total

* if your file does not contain a Transaction ID, the program will generate a unique transaction ID for each of those transactions based on the date and the number of transactions without a unique ID.

April 2010 Updates

We’ve had a minor version update to fix the persistent request for a Validation Key for users who have purchased a license. You will need to install the latest version (2.0.0.3) for the fixes to have an effect.

1. Validation Key fix. (see image to the left)

  • Confirm Version number via help dialog.
  • Return to main screen and while connected to the internet, Press F9 (function button)
  • A message should appear in the bottom left corner (after approx 5 seconds) saying Done updating.
  • Return to the help dialog. Your license key SHOULD now be displayed rather than the Trial Key.


2. Clear Screen / Grid.

You can now refresh / clear the grid before between loading files by pressing F5 (function button).

3. Help Files.

You can access the help files / pages by pressing the F1 (function button). The pages are only available online, so you need to be connected to the internet to access them.

iCreateOFX Team

iCreateOFX Basic 2.0.0.2 -Help pages and Video Guides


Due to the increase in support queries, the team has published a couple of video guides on the the most frequently asked tasks. These, in addition to the Quick Start Guide, can be accessed via the links below.


For the video guide.

For the video guide.

For the guide.

For the new product page.


iCreateOFX Team.

iCreateOFX Basic 1.0.0.2

The minor version release of the Basic version went live on 17th November and has the following enhancements.

Nationwide support for all accounts.

Individual scripts to support Nationwide (UK) accounts for:

Current accounts, Savings accounts and credit cards

Select the appropriate account to load the CSV file downloaded.

Runtime Account information.

The program now displays the account details (as entered on loading) for the current file. NOTE: As per illustration, a Bank Code of XXXXXXXXX is designated for credit card files. You will notice this when you select the account type on loading the CSV.

Supported Banks.

The list of supported banks (thanks to users who send the headers) has steadily increased.

As of 17th November 2009, we have scripts specific to 17 banking institutions. Coupled with the Generic scripts that ship as standard, coverage of most banks that offer CSV downloads is wide. We encourage users to submit their CSV file headers if they would like scripts written for their banks / financial institutions.

Banks on the list are: Alliance & Leicester (UK), Lloyds TSB (UK), Hoares Bank (UK), Co-op Bank (UK), Abbey (UK), Nationwide (UK), Westpac (AUS), Erste Bank (DE), VolksBank (DE), SocGen (FR), Carrefour (FR), Discover (US), Barclaycard (UK).

Thanks to all contributors.

Help pages and support for Version 1.0.0.59

Help page links in the latter releases of Version 1.0.0.59 via the taskbar image and the installed folder links have been moved in preparation for the licenced version release by our affiliates. You can still access these pages via the links below:

For the Product Home Page

For the QuickStartGuide.

For the BankScript help / guide.

Support via e-mail (and responses to blog queries) will remain available for the free version for the immediate future.

Links to the licensed version will be posted here, on the free version product site.


Thank you for all your in-put and donations.

Bespoke and commercial versions licences.

Due to sustained interest in the Bespoke Versions of iCreateOFX, we have decided to have a permanent link on the downloads page of the site (and below).

For systems with an existing installation of the program, select the about button on the top right of your screen to get a dialog as below.

Select and copy the “Registration Key” (highlighted in green above) and paste it into the the box below “Version 1.0.0.59 Reg. key”  as illustrated below. If you have not installed the free version on the system you intend to install the bespoke version, then enter your contact e-mail address in this field.


You will then have to select the licence period option that you require before selecting “Buy Now”  and being redirected to our PayPal payment pages.

The licence fees also apply to commercial usage of iCreateOFX and the same payment interface should be utilised by individuals utilising the program for non-personal use. Remember that licences are for each machine on which you have installed the program. If you still need help, get in touch with customer support.

iCreateOFX Team

Blank “Loaded Data” screen after selecting file to open.

There have been several queries from users regarding having a blank screen after you have selected a file to load.

This is MAINLY caused by the format of the “Date” column in the file to be imported. Below are some guides:

  1. Ensure the date format used in the file is made up of: Two digit month and day, and a four digit year.  (ex. US mm/dd/yyyy and GB dd/mm/yyyy). 
    Separators must be forward slashes (ex. "/").  Alpha-numeric date formats are not acceptable (ex. March 11, 2009).
  2. The date format used in the file to be imported MUST be the same as your system date format.

After ensuring the above are complied with, you should not experience the “blank screen” again.

iCreateOFX Team

Accessing the QuickStartGuide.

Did you know that you can quickly access the QuickStartGuide via the iCreateOFX tool bar icon? Simply right click on the icon, select Help and then choose your desired help topic. You can also access the BankScript tutorial page from here.

Would you like to take part in the soon to commence beta testing for support of Investment transactions? Send an e-mail with the subject matter: BETA-INV01 to mail@kkltd.co.uk

We will be sending out download links from mid September 2009. Participation in beta testing MAY earn you a one year usage licence of the release version.

iCreateOFX Team

August 2009 update – Of BankScript(s) and OFX Investment Transactions

It has severally come to our attention that some installations throw an error when you try to add a new script for your bank. We have, thus far, been un-able to pinpoint the cause of this, however, we have a work-around for those who would like to try it out.

1. Locate the program initialisation file iCreateOFX.ini (search for it on your computer).

2. Each entry in the file is a BankScript relating to a bank in the format as below:

RBS(UK),9,10,11,16^17,CR
PayPal(Personal),0,4,3,7,CR
Lloyds(UK),2,4,0,5^6,CR

For those interested in a script for RBS, Lloyds or Paypal personal, you can simply copy the above into your ini file.

3. The scripts represent the Script Name (in this case the Bank Name), followed by the fields to load into the program ending with "CR" for current / savings / checking accounts or "CC" for credit card accounts. The fields are separated by commas except in the case of files with two fields for amount (i.e for Debit and Credit transactions).

4. You can either manually enter these details into the file and then restart iCreateOFX to have them loaded or to ensure that before you save the file, the cursor is on a new (empty) line.

Finally, due to overwhelming enquiries about supporting investment transactions, we shall be making available a beta module for investment transactions’ support in September 2009. If you would like to take part in the beta test, please send an e-mail to mail@kkltd.co.uk with the subject line Beta INVTRN. Future releases supporting investment transactions will only be available with a commercial licence.

iCreateOFX Team

iCreateOFX 17th July Beta Release

Convert your csv and xls / xlsx files to OFX.

This release has several enhancements to the previous beta release.

1. Load Selected File to program Button.

On selecting a file from the treeview and pressing this button, the associated windows program will be loaded. For OFX files (if you have the files associated with MOA) the bank file upload wizard will be fired up,in the case of csv and xls files, the files will be loaded into Excel.

USES: You can use this feature to edit files to a format that iCreateOFX can use to generate your OFX file. On the other hand, it is a shortcut for uploading a bank file to MOA after creation. You can additionally launch any file with a program installed on windows and associated to it by editing the textbox. For example, entering C:\ in the textbox fires up Explorer.

2. Multi Currency support.
The program now supports EUR, USD and UGX in addition to the standard GBP. The account format supported is still only UK standard, purely because there have been no requests to support other formats. To make such a request, send your request to: mail@kkltd.co.uk clearly stating the format you require to support.
 
3. View OFX file.
You can now view the generated OFX file (for debug purposes) before you upload the file by clicking the tab labelled "View OFX". This functionality, as mentioned, is purely for debuging. Look out for the account number and closing balance ammounts to ensure congruence with your statement.
 
You can download the latest release from the download section: http://kkltd.co.uk/downloads.aspx


18 November 18:49
Update on 17th November posting.
 
Further to our posting of 17th November, we can now confirm that the Bank Script help file is now up. You can access it through the help button on the "Add New Statement" dialog from version 1.0.0.45, or via this link for those who have not had the chance to upgrade to the next minor version.
 
While on the subject of upgrading / or up-versioning as we prefer to call it here at HQ, the prompting for up-versioning should be automatic if there is an update (and you are connected to the internet). There is no need to check the site and download, or indeed send request e-mails for up-versioned releases.
 
iCreateOFX Team


17 November 12:59

There have been a few goings on back at HQ which have resulted in an update / enhancement further to your feedback.
 
1. Handling of files. – The default handling of files to be loaded has changed to a simpler process. All *.csv and Excel files that have the default 3 or 4 columns will be automatically loaded without need to select the account type; the result of this will be that the account type will display as either "3 Column Default" or "4 Column Default". (we thought we’d make the naming that bit more complicated to keep you all interested!) In the case of loading credit card data, you will have to select "Credit Card" from the account type drop down before writting your *.OFX
 
2. Bank Scripts. – As has been the case from the start, we are in-undated with requests to write scripts to load your specific bank statement formats. The good news first, all bank account formats will from now be supported. Yes, you heard that right! iCreateOFX  from version 1.0.0.44 onwards will support all *.csv and / or Excel files downloaded straight from your bank. And you do not even need to share "your" bank file format with us (or any other person who may find use for it!). The other news is that you will have to set it up yourself, however, this is not as hard as you may think. We’ll be updating the Readme / Help file soon (and from the site metrics it seems most of you out there refer to it frequently). All you need to do is select "Add New Statement" from the account type drop down, give your statement a name that you’d like it to be called, and fill in the zero-based comma separated column references that you would like to load. For double column statements, separate the values with the "^" (accent) key without the double quotes. The caveat for this is that the program only supports a maximum of five columns, so you will have to limit the narrative columns that you pick up t just two.
 
3. QIF import support. – Those who have been updating frequently will have noticed that we now support *.QIF file import and conversion to OFX. Just to mention, this is still in its infancy, and to be honest, the final and comprehensive support will only be available on the commercial release. At the present time, there is no implementation of split transactions. NOTE however that the principal sum is imported, therefore, we believe the target users will be limited to home users, since FURTHER that support for Investment and other accounts is not implemented. To summarise, QIF support would be ideal, in the present implementation, for home users of current accounts that do not have / would not require to import split transactions.
 
4. iCSV format change. – The format for iCSV files saved has changed (again!) to include all details pertaing to the account on all transactions. This has been done in order to improve archiving (release period to be notified) of data and for future compliance. As a consequence of this, you will not be able to save to iCSV without filling out all the account deatils, as was the case previously. Additionally, some iCSV files saved by previous versions may fail to load (if they were saved without all account details). If you encounter this problem, do not hesitate to contact us, or your vendor  to run you through the fix.
 
Finally, May I thank you all for the feedback (and some of you the donations!) without which we’d never have published the "accomplished" prouct that you have. Thanks again and until next time "Mind the credit crunch by tracking your finances, iCreateOFX is just your tool!" – iCreateOFX Team


18 August 14:40

Just a note to all who have been asking the question about the format of the files.
 
The "ideal" file format is a *.csv or a spreadsheet file with the following fields:
1. Date – This is in the format of UK Date & Time i.e 01/02/2008 for 1st February 2008
2. Details – This is the legend to describe the transaction being recorded e.g Cash withdrawal
3. Amount – This is the transaction amount e.g 200.23
NOTE: For amount, the number can be signed for Negative (e.g -200.23) for withdrawals from a current account; bear in mind that the signs are reversed for Credit Card accounts and certain dealing accounts. For further assistance please get in touch with customer support on icreateofx@kkltd.co.uk


24 September 18:44

September 2008 release.
 
Refresh Treeview Button – Use this to update the tree view when you save files to your working directory. Account Types – There are three account types supported at the moment. CHECKING and SAVINGS account types are treated as the normal current accounts i.e debit transactions reduce your balance and credit transactions increase your balance. This above noted treatment of transactions is reversed for the MONEYMRKT account (similar to a credit card account). Save to iCSV – we have replaced the save to CSV with the save to iCSV (which is an iCreateOFX extension) to improve the handling of files processed via the program i.e the added headers that are required to generate an OFX file. This means that no new columns will be added to the file when loading and the header row will not be loaded automatically. If you saved without the header and need to include one, do so via the “Insert Header” button. This, we hope, will improve users’ archiving and distinction of files processed by the program. NOTE: The format of iCSV is the same as that of any *.csv and can be opened with your favourite text file viewer. View OFX Tab – It has come to our attention that this functionality is greatly used by beta testers. Though it was intended as a debugging tool, we are happy to shed some more light on how to make use of it. You will need to have installed the program via the setup.exe that it shipped with in order to access the screen. Alternately, have the files mentioned below in the same directory from which you are executing the “iCreateOFX beta.application.exe”. Additionally, for those interested in “tweaking” the report format, you will need to edit two files / style sheets that ship with the program, OFXView.xsl and VoiewOFX1.xsl.

 Finally, thanks for all the feedback and keep enjoying it while it is still free!


18th October 2008
Another release with enhancements.
 
Its has been a while since we updated the blog, however, for those of you who have been checking for our regular releases, there is no doubt that a lot of activity has been going on in the background, and this, we are confident, you can see in the program’s abilities. Just to expound on some issues that have been raised by some of our late adopters.
1. There have been increased incidences of new adopters having their files rejected / termed as incorrect format by MOA (both the express and professional editions). As we pointed out in our September mail-shot, MOA is quite rightly very "sensitive" shall we say, to the format of the file. It expects a file that does not contradict its elements, for example, most people forget to set the statement dates on writting the *.ofx file. This will cause MOA to reject the file UNLESS all transactions that are in the file are dated for today (being the date on which you ran the program). FIX – We have now included a fix for this, the dates will default to the earliest and latest dates that are in the loaded file. Attention is again drawn here to instances when you add further transactions after loading the file. Ensure that the dates fall within the span selected at loadtime, or ensure that you change the dates to reflect the transactions in the grid.
 
2. Support for Money is also on of the agenda. Currently, you can import iCreateOFX authored files into Money, however, we do not support all the accounts and message set at the moment. For current and savings  accounts, the support is already there as per MOA. It may be of interest to the technically minded to note that support for transactions and implementation as per Microsoft specifications, is very different for Microsoft Money and Microsoft Office Accounting! Now there is something for you to mull over the weekend.
 
3. Bank Scripts – We were in-undated with requests to include support for bank scripts by many of you in the early developement, however, at the time we did not believe we had enough capacity to cater for these. It may be of interest to you to know that we are now fully behind the idea of incorporating scripts for different banks. If you would like your bank supported, please send us an anonymalized file of your bank download file, and we’ll gladly include it. You will be able to select the script of your bank via the account type drop-down button.
 
We really hope that you are enjoying or even benefitting from the use of this program, should you feel the need to support the further developement, I am sure you ahve noticed the begging buttons all over our pages, please feel free to be generous! And until next time, "Mind the credit crunch by tracking your finances, iCreateOFX is just your tool!" – iCreateOFX Team